'A wheel of compliments' - card
#kaisercraft #challenge #daydreamer #circles
Hey everyone! So it has been very hard to not procraftinate whilst studying for my exams, but since they are over I can now create guilt free! Kaisercraft's June blog challenge is circles, so I took the challenge quite literally and made a circle card, but with a little spin to it...


I have been a little obsessed with circles lately, here is another papercraft project of mine that was circle inspired! I hope this project inspires you to create cards that are a little different to the ordinary. Make sure to have a look at my instagram to see this spinner card in action! I hope to make a more interactive cards down the track! Happy papercrafting!
Shanika :)
Hey everyone! So it has been very hard to not procraftinate whilst studying for my exams, but since they are over I can now create guilt free! Kaisercraft's June blog challenge is circles, so I took the challenge quite literally and made a circle card, but with a little spin to it...

I saw the stamp set from Kaisercraft's 'Daydreamer' collection and I just had to have it! Nothing like doing some craft shopping to celebrate the end of exams! Also got the paper pad as well just because I couldn't resist! :)
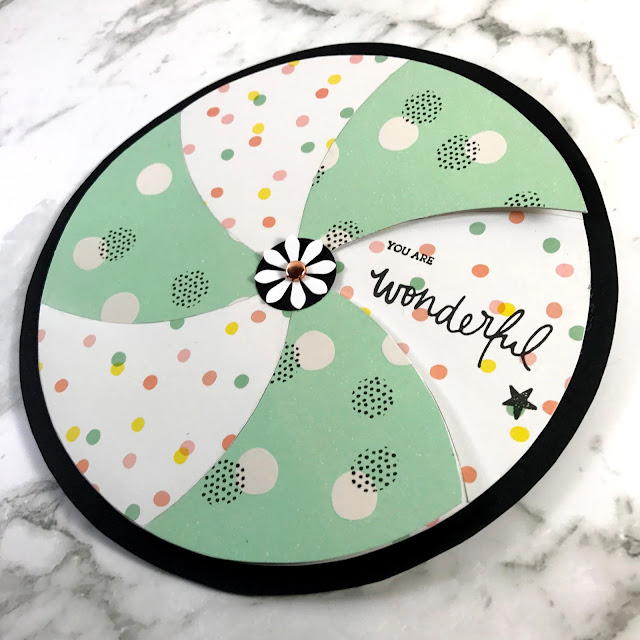
To make this spinning card you need two wheels, one with an opening (I will refer to this as the 'top wheel') and a wheel with all the sentiments (I will refer to this as the base wheel). I used three sheets of patterned paper from the pad, two of which were the same pattern and then I cut them down to circles with a diameter of 6 1/2 inches (used a compass to draw the circles). I also used a white piece of cardstock cut down to 6 1/2 inch diameter circle for the top wheel and used a black piece of cardstock and cut out a 7 inch diameter circle for the base wheel of the spinner (you can definitely make a smaller version of this and use circle dies to make the circle cutting process easier).

To create the six segments on the top wheel place the tip of the compass on the edge of the circle and draw a curve that goes through the centre of the circle to the edges, then move the compass to the point where the line crosses the edge and draw a curve through the centre again. Repeat until you form a six petal flower. Do this for the patterned paper circles too.
Then you will need to cut out a segment from the white cardstock circle as shown in the image above, this will be where the sentiment will be visible. Now cut out all the segments for the patterned paper and stick alternating patterned paper segments as shown in the image above. Add a small circle to the centre of the top wheel, this will allow us to connect the two wheels by adding a brad through the centre.

Next take six of the same patterned paper segments and stamp with the sentiments you like, make sure you stamps the sentiments in the same direction. Then adhere these segments to the base. Note that the patterned I chose for the base is the same as the patterned paper on the top wheel but a segment apart, this is to maintain the alternating paper pattern to look a little like a pin wheel! Once you have the top wheel and base wheel, create a small hole in the centres with a pin and connect the two wheels using a brad. I added a small punched flower to add a little interest to the centre. You can easily add a message to the recipient on the back of the spinner card! :)
Kaisercraft materials used: Daydreamer collection - 6 1/2 inch paper pad, clear stamp set | 12 x 12 cardstock - black, white | Pigment ink - black | Decorative die - circle
Other: Brads

I have been a little obsessed with circles lately, here is another papercraft project of mine that was circle inspired! I hope this project inspires you to create cards that are a little different to the ordinary. Make sure to have a look at my instagram to see this spinner card in action! I hope to make a more interactive cards down the track! Happy papercrafting!
Shanika :)


Comments
Post a Comment